The Camera Module
The Camera module provides a live video feed from one or more imaging devices and also serves as a visual representation of the global coordinate system for photostimulation and laser imaging controls. It may be used to record single frames or to stream video to disk alongside any available metadata including the imaging device settings in use, optical train state (such as which objective lens is in use), and the coordinate transformation needed to determine the original location and scale of the image.
The Camera module also provides image processing features helpful for enhancing image contrast for cell patching and calcium imaging. For patching, the module’s background subtraction features remove optical artifacts and provide enhanced contrast by flattening the illumination gradient across the image. For experiments using calcium imaging (or other fluorescent indicators), the module provides background subtraction with a continuously-updating background. This acts as a high-pass filter, allowing active fluorescence signals to be quickly identified. Additionally, the module will plot the intensity over time of a region of interest, allowing a local fluorescence signal to be monitored by the experimenter.
The display area of the Camera module serves as a visual representation of the global coordinate space. In addition to images generated by the camera, it also displays data and user interface controls generated by other modules. A module for laser scanning imaging, for example, displays a rectangle in the Camera module window that can be positioned by the user to determine the area imaged with a multiphoton laser system. Likewise, photostimulation sites, grids, and scanning paths are all displayed in the Camera module allowing photostimulation patterns to be defined in relation to either camera or multiphoton imagery. Online analysis modules may also use this space to display photostimulation mapping results or images generated in scanning imaging tasks.
On systems with access to stage position information, the Camera module will track the current stage position and update the virtual coordinate space accordingly. This allows, for example, marking the location of specific cells or sites in the preparation, configuring large, multi-part photostimulation maps, and building large image mosaics which are displayed behind the camera feed. For systems with multiple microscope objectives, the ability to build such mosaics provides a persistent, low-magnification view of the sample, allowing the experimenter to navigate around the sample under high magnification without switching objectives. Likewise, photostimulation patterns may be arranged over large, arbitrary areas outside the visible range of the camera sensor.
Configuration
Although the Camera module does not accept any configuration options of its own, it must (like all modules) appear in the modules section of the configuration:
modules:
    Camera:
        module:  'Camera'
        shortcut: 'F5'
Recording dock
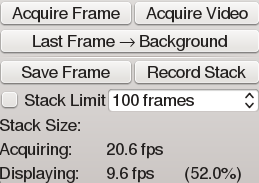
The Recording dock contains basic controls for starting image acquisition, storing images, and copying images to the background of the viewing area.
- Acquire Frame Start the imaging device, capture a single frame, then stop.
- Acquire Video Start the imaging device and continuously display frames as they arrive.
- Last Frame → Background Copy the most recently acquired frame to the background of the display area. This is used mainly on systems with stage position feedback. Background frames may be removed by right-clicking on them.
- Save Frame Record a single frame to disk. The image is stored as a .tif file in the currently selected storage directory.
- Record Stack Stream incoming video to disk. Data is stored as a MetaArray file in the currently selected storage directory.
- Stack Limit If checked, this value causes stack recording to halt after acquiring the specified number of frames.
Device control dock
The device control dock contains device-specific controls for configuring the device. Most cameras implement a simple, standard interface:
- Binning sets the pixel binning used by the camera.
- Exposure sets the frame exposure time used by the camera.
- Full Frame causes the region-of-interest acquired by the camera to be set to include the entire sensor area.
Cameras also allow control of their region-of-interest by dragging handles drawn around the camera frame in the display area. Device settings not displayed here are usually available via the Manager module interface.
Display control dock
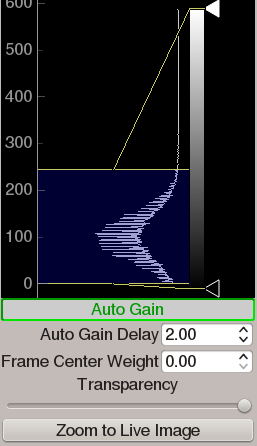
The display control dock determines how the values recorded by the camera (usually 16-bit integer) are converted into 32-bit RGBA image colors for display. These controls do not affect the data that is stored to disk.
- Histogram/Gradient This control is used to
- Display a histogram of values collected from the imaging device
- Select the minimum and maximum values to be mapped to RGB color. The yellow lines displayed over the histogram set these values, and are used to change the brightness and contrast of the displayed image.
- Color gradient for determining how the image is colored. By default, the image is simply displayed as greyscale. New ticks (triangles adjacent to the gradient) may be added to the gradient, and their color may be selected by clicking on the ticks.
Auto Gain When depressed, this causes the min/max levels described above to automatically adjust to follow the brightness of the image.
Auto Gain Delay Applies time-smoothing to the auto gain control, which prevents it reacting strongly to noisy image data.
Frame Center Weight As this value increases toward 1.0, the auto gain control uses a greater propertion if the center 1/3 of the frame in determining its min/max values. This is particularly useful when the edges of the image are much brighter or darker than the center.
Transparency controls the transparency of the dinsplayed camera frame, allowing data behind the image to be seen.
Zoom to Live Image causes the display area to zoom such that the camera image fills the entire view.
Background subtraction dock
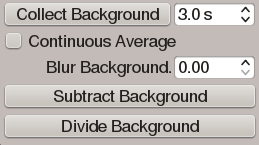
Background subtraction is used to improve the contrast (either spatial or temporal) of some aspect of the displayed image. These controls affect only the displayed image, and not the data that is stored to disk. It may be used to correct uneven illumination, remove optical or camera sensor artifacts, or to make time-varying signals in the video more apparent. Use of background subtraction is described in the patching tutorial and the calcium imaging tutorial.
- Collect Background When clicked, this causes the camera module to collect frames for the specified time, then store the average of those frames as the background frame. (Note that the camera must already be acquiring)
- Continuous Average When checked, background frames are continuously integrated into the averaged background frame, and the time specification instead controls the approximate integration period for this process.
- Blur Background causes the background frame to be smoothed with a gaussian blur before being removed from the displayed image. This can have a contrast-enhancing effect. However, better results can be achieved by collecting a background image that is blurred by defocusing the objective lens instead.
- Subtract / Divide background When depressed, these cause the currently stored background frame to be subtracted or divided from newly acquired frames before they are displayed. Division is more useful in situations where the overall light level may change over time.


